Azure CSP Billing Sources
Last updated: October 23, 2026
Once Kion is installed in your environment, provide the Azure CSP API access to manage your Azure resources and access to your billing data. Then, add the info to Kion, and set up a billing source in the application.
Before you can create Azure subscriptions or resource groups through Kion, you need to ensure creation is enabled on the Azure billing source.
Note: If you are unsure what your Azure billing account type is, see Identifying Your Azure Billing Type.
Requirements
Credentials for the Azure domain with access to the CSP Portal.
Configure Azure CSP Access Settings
First, we will configure the Azure API to manage your Azure resources and the CSP API access to access billing data.
During this process, take note of your app registration's Application (client) ID and Client Secret Value for later use.
1. Configure the App Registration
Kion requires an app registration with a client secret to interact with the Azure APIs.
Follow the steps to configure an existing registration if you already have Azure registered for SAML 2.0 authentication in Kion. Otherwise, select the tab to create a new registration.
Configure an Existing Registration
Log in to the Azure Portal.
Search for and select the service:
Microsoft Entra ID.Navigate to Manage > App Registrations.
Click All Applications tab.
Click enterprise application you're using for SAML with Kion.
Record the Application (client) ID from the overview somewhere you will be able to reference it later.
Select Authentication in the left menu.
In the Redirect URI section, click Add URI.
In the URI field, enter the base URL of your Kion instance and append the path:
/api/v3/account/link-azure-callback
For example, if your Kion instance is hosted at https://yourcompany.kion, you would enter:https://yourcompany.kion/api/v3/account/link-azure-callbackClick Save.
Select Certificates & secrets.
In the Client secrets section, click New client secret.
For the Description, enter:
Kion ApplicationSelect an expiration period for the client secret.
Click Add.
Copy the Value next to your client secret from the client secrets table, and store it in a password vault.
Create a New Registration
Log in to the Azure Portal.
Search for and select the service:
Microsoft Entra ID.Navigate to Manage > App Registrations.
Click New Registration.
In the Name field, enter:
Kion App RegistrationFor Supported account types, select Accounts in this organizational directory only.
For the Redirect URI Platform, select web.
In the URI field, enter the base URL of your Kion instance and append the path:
/api/v3/account/link-azure-callback
For example, if your Kion instance is hosted at https://yourcompany.kion, you would enter:https://yourcompany.kion/api/v3/account/link-azure-callbackClick Register.
Record the Application (client) ID from the overview somewhere you will be able to reference it later.
Navigate to Manage > Certificates & secrets.
In the Client secrets section, click New client secret.
For the Description, enter:
Kion ApplicationSelect an expiration period for the client secret.
Click Add.
Copy the Value next to your client secret from the client secrets table, and store it in a password vault.
2. Assign API permissions to the App Registration
Kion requires several Microsoft Graph permissions to read user data and associate Azure user accounts with Kion users. Kion also needs permission to manage user groups, so it can ensure Azure Users have the correct permissions on subscriptions.
If you aren't already there, navigate to Azure Portal > Microsoft Entra ID > App Registrations > Your Kion app registration.
Select API permissions in the left menu.
Click Add Permission, and add the following permissions:
Microsoft Graph > Delegated permissions > User.Read.
Microsoft Graph > Delegated permissions > Directory.Read.All.
Microsoft Graph > Application permissions > User.Read.All.
Microsoft Graph > Application permissions > Group.Read.All
If you would like Kion to automatically rotate the Client Secret, also add the following permissions:
Microsoft Graph > Application permissions > Application.Read.All
Microsoft Graph > Application permissions > Application.ReadWrite.OwnedBy
Click Grant admin consent for [your app registration name]. This ensures users are able to link their Azure accounts.
If you added the permissions for automatic Client Secret rotation, you will also need to run the following commands:
APP_ID='YOUR_APP_REGISTRATION_ID'az ad app owner add --id $APP_ID --owner-object-id $(az ad sp list --filter "appId eq '$APP_ID'" --query [].id --output tsv)
3. Add the App Registration to a Management Group
Kion manages Azure resources under a management group. By granting Kion access to a management group, the application will be able to access and manage all resources and subscriptions contained inside the management group.
Note: Kion supports nested management group schemes, but should not be granted access to multiple management groups at different levels in the same hierarchy.
If you haven't configured management groups yet, see Microsoft's article Create a management group to set up a management group, and then Add a Subscription to a Management Group to add the subscription(s) you want to manage in Kion to the group.
In the Azure portal, search for and select the service:
Management Groups.Select the management group containing the subscriptions you want to manage in Kion. For consistency and visibility, we suggest selecting your highest level management group.
Navigate to Access control (IAM) > Role assignments.
Click Add > Add role assignment.
Select Role > Privileged administrator roles.
Search for and select
Owner.Click Next.
For Assign access to, select User, group, or service principal.
Click Select members.
Search for and select your Kion app registration.
Click Review and Assign.
Click Assign.
4. Retrieve the Microsoft ID for the CSP
Log in to the Microsoft Partner Center.
Navigate to Dashboard > Customers.
Select the Company nameof the customer.
Click Account.
Under the Customer account info section, copy down the following values:
Microsoft ID
Domain name
Adding the CSP Access Information into Kion
Kion imports your financial data through a billing report export.
1. Export Your Billing Data to a Storage Account
Next, we will create a recurring export that places your billing data in an Azure storage account where Kion can access the data.
During this process, take note of the name of your storage account name, the storage container name you select to export your data to, and the directory path your data is saved to.
In the Azure portal, search for and select the service:
Cost Management.Navigate to Settings > Exports.
For the scope, select the management group you are using for Kion.
Click Add.
For the name, enter
Kion billing export.For the export type, select Daily export of month-to-date costs.
For FOCUS specific setup information, please reference here.
For the start date, select today's date or the date you want to begin the export.
For storage, select Create new.
Select the subscription for your Azure storage account.
Select a resource group or create a new one.
Enter a name for the storage account.
Select the location (Azure region).
Enter a name for the container.
Enter the directory path that you want the export file to go to.
Click Create.
Creation of the storage account and container may take some time.
2. Add the Storage Blob Data Reader Role to the Container
To manage your billing data, your storage container must be enabled for blob storage.
In the Azure Portal, navigate to Cost Management > Exports.
Click the Storage account link next to your export in the list.
In the left menu, select Containers.
Click the ellipsis menu next to your container, and select Container properties.
In the left menu, select Access Control (IAM).
Select the Role Assignments tab.
Click Add.
Search for and select
Storage Blob Data Reader.Click Next.
For Assign access to, select User, group, or service principal.
Click Select members.
Search for and select your Kion app registration.
Click Review and Assign.
Click Assign.
3. Create a Billing Source in Kion
Log in to Kion.
Navigate to Accounts & Scopes > Billing Sources.
Click Add New.
For the Account Type, select Azure CSP Commercial or Azure CSP Government.
For the Billing Source Name, enter a friendly name for your account.
For the Domain, enter your Azure domain (
[yourdomain].onmicrosoft.com, or[yourdomain].onmicrosoft.usfor Azure Government).For the App ID, enter the Application (client) ID from your app registration.
For the Client Secret, enter the Client Secret Value from your app registration.
For the Allow Resource Group Creation option, select whether this billing source should be able to create new Azure resource groups.
Click Test Tenant Connection to test the if Kion can communicate with Azure using the credentials you entered.
An indicator shows whether the tenant connection is active (green) or inactive (red) and the date that its status was last updated. For inactive connections, see Troubleshooting Your Azure Connection.
File Type Selection
Selecting FOCUS will generate data from the FOCUS data export
Click here for more information on the FOCUS spec
Selecting FOCUS and Azure Billing Export will prioritize generating data from the FOCUS export, and the Azure Billing Export will be an alternative option if Kion is unable to find the FOCUS export.
Selecting Azure Billing Export will generate data from the default Azure billing file.
For the Billing Start Date, enter the date when you would like financial data to be available. This date should not be before the export was created.
For the Storage Primary Endpoint, enter:
https://[your storage account name].blob.core.windows.net(for Azure Government, usehttps://[your storage account name].blob.core.usgovcloudapi.net)For the Storage Container, enter the name of the container you exported your billing data to.
For the Storage Prefix, enter the directory path to your exported data. You only need to include the directories after the name of your storage container. For example, using the location pictured below, you would enter
report/cloudtamerexport.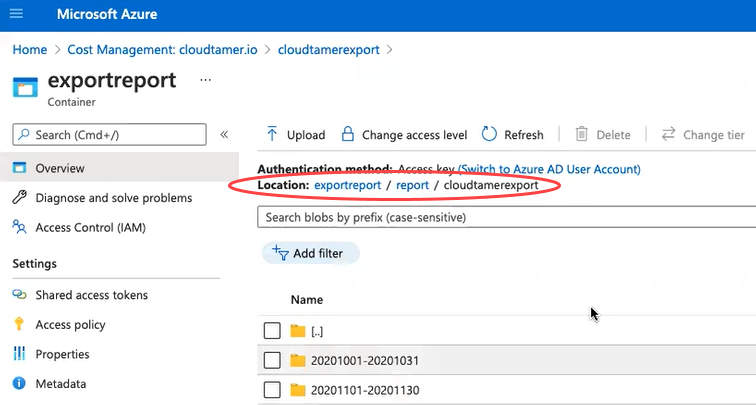
For the Allow Subscription Creation option, select whether this billing source should be able to create new Azure subscriptions.
If you allow subscription creation, enter the CSP Customer ID: the Microsoft ID of the customer. You can find it in the Azure Portal: under Azure Services, click Microsoft Entra ID, then find the Tenant ID in the Tenant Information section. The Tenant ID is the same as the CSP Customer ID.
If you allow subscription creation, select the Azure CSP that this customer purchases subscriptions from. To add an Azure CSP, see Partner Center below.
Click Test Billing Connection to test the if Kion can communicate with Azure using the credentials you entered.
An indicator shows whether the billing connection is active (green) or inactive (red) and the date that its status was last updated. For inactive connections, see Troubleshooting Your Azure Connection.
Click Create Billing Source.
Your billing data will be pulled in to Kion the next time new data is available in your Azure storage. It can take 12-24 hours before the export runs in Azure and data is shown in exported files. A connection error badge may show next to the billing source in Kion until financial data is successfully retrieved.
Partner Center (Subscription Creation Only)
Kion needs access to Cloud Service Provider (CSP) APIs so it can create Azure subscriptions for CSP customers. You only need to complete this section if you want Kion to create subscriptions through your billing source.
Obtain Partner Consent
Azure CSPs use the Microsoft-recommended authentication strategy, making it compatible with Azure Government CSPs.
In the left navigation menu, click Accounts & Scopes > Azure CSPs > Add New.
Give your CSP a name to identify it within Kion in the Name field.
Select the CSP Type from the dropdown menu. Kion supports Commercial CSPs and Government CSPs.
You can obtain partner consent by either entering the partner domain name application registration ID, and application client secret now, or you can generate a link to send to your partner so they can enter the information themselves. For more information, see Azure CSP Partner Consent.
Click Create Azure CSP.
Enabling CSP Subscription Creation
Before you can create Azure subscriptions or resource groups through Kion, you need to ensure creation is enabled on the Kion billing source and in the Azure Portal. If you enabled the Allow Resource Group Creation or Allow Subscription Creation options on your billing source, follow these additional steps to enable account creation.
During this process, take note of the Tenant Root Group and Object ID for later use.
Login to the Azure console with a user that has the Global Admin Microsoft Entra ID role.
Search for and select
Tenant properties.Enable Access Management for Azure Resources to provide the current user with access to manage all Azure subscriptions and management groups in the tenant.
Search for and select
Management groups.Record the ID for the Tenant Root Group (ID).
Search for and select
Enterprise applications.Select your Kion app registration.
Record the Object ID.
Open up a terminal on your local system or open up the Azure Cloud Shell.
Save the following text to a file named role.json in the current directory. You should replace
with the Tenant Root Group ID from the step above.
 {
	"Name":  "Minimal subscription move",
	"Description":  "Allows Kion to move created subscriptions under an owned management group",
	"Actions":  [
		"Microsoft.Authorization/roleAssignments/write",
		"Microsoft.Authorization/roleAssignments/delete",
		"subscriptions/write"
		],
	"AssignableScopes":  [
		"/providers/Microsoft.Management/managementGroups/<ROOT MANAGEMENT GROUP ID>"
	]
}
Run the following command to create a role definition from the role.
az role definition create --role-definition @role.json
To assign the role to the app registration, run the following command.
Replace the $SERVICE_PRINCIPAL text with the Object ID from the step above.
Replace the $ROOT_GROUP_ID text with the Tenant Root Group ID from the step above.
az role assignment create \
--assignee $SERVICE_PRINCIPAL \
--role "Minimal subscription move" \
--scope /providers/Microsoft.Management/managementGroups/$ROOT_GROUP_ID